Introduction
Overview
Teaching: 0 min
Exercises: 0 minQuestions
What is Common Workflow Language?
How are CWL workflows written?
How do CWL workflows compare to shell workflows?
What are the advantages of using CWL workflows?
Objectives
Understand why you might use CWL instead of a shell script
Common Workflow Language
Computational workflows are widely used for data analysis, enabling rapid innovation and decision making. Workflow thinking is a form of “conceptualizing processes as recipes and protocols, structured as workflow or dataflow graphs with computational steps, and subsequently developing tools and approaches for formalizing, analyzing and communicating these process descriptions” (Gryk & Ludascher, 2017).
However as the rise in popularity of workflows has been matched by a rise in the number of disparate workflow managers that are available, each with their own standards for describing the tools and workflows, reducing portability and interoperability of these workflows.
CWL is a free and open standard for describing command-line tool based workflows1. These standards provide a common, but reduced, set of abstractions that are both used in practice and implemented in many popular workflow systems. The CWL language is declarative, enabling computational workflows to be constructed from diverse software tools, executing each through their command-line interface.
Previously researchers might write shell scripts to link together these command-line tools. Although these scripts might provide a direct means of accessing the tools, writing and maintaining them requires specific knowledge of the system that they will be used on. Shell scripts are not easily portable, and so researchers can easily end up spending more time maintaining the scripts than carrying out their research. The aim of CWL is to reduce that barrier of usage of these tools to researchers.
CWL workflows are written in a subset of YAML, with a syntax that does not restrict the amount of detail provided for a tool or workflow. The execution model is explicit, all required elements of a tool’s runtime environment must be specified by the CWL tool-description author. On top of these basic requirements they can also add hints or requirements to the tool-description, helping to guide users (and workflow engines) on what resources are needed for a tool.
The CWL standards explicitly support the use of software container technologies, helping ensure that the execution of tools is reproducible. Data locations are explicitly defined, and working directories kept separate for each tool invocation. These standards ensure the portability of tools and workflows, allowing the same workflows to be run on your local machine, or in a HPC or cloud environment, with minimal changes required.
RNA sequencing example
In this tutorial a bio-informatics RNA-sequencing analysis is used as an example. However, there is no specific knowledge needed for this tutorial. RNA-sequencing is a technique which examines the quantity and sequences of RNA in a sample using next-generation sequencing. The RNA reads are analyzed to measure the relative numbers of different RNA molecules in the sample. This analysis is differential gene expression.
The process looks like this:
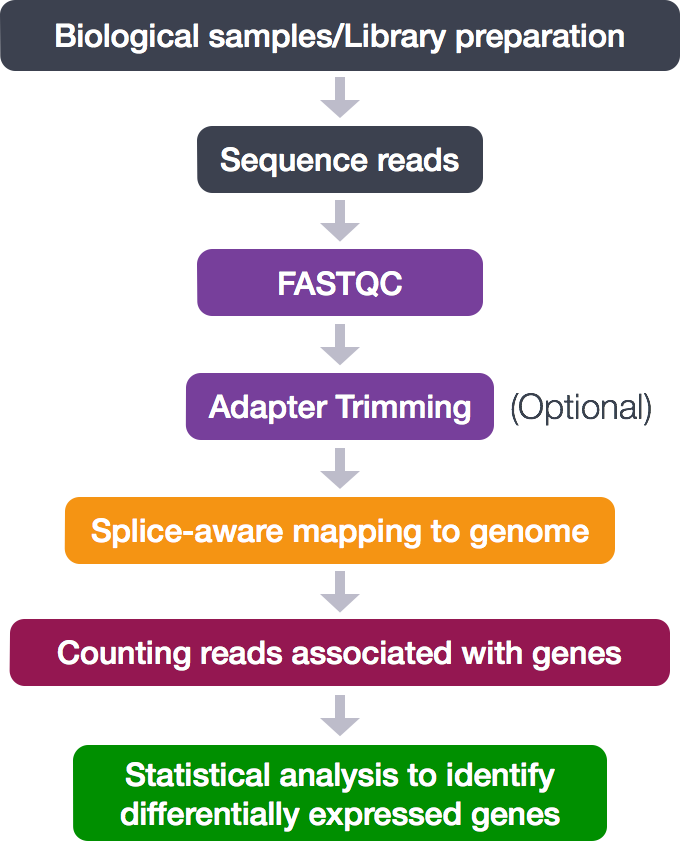
During this tutorial, only the middle analytical steps will be performed. The adapter trimming is skipped. These steps will be done:
- Quality control (FASTQC)
- Alignment (mapping)
- Counting reads associated with genes
The different tools necessary for this analysis are already available. In this tutorial a workflow will be set up to connect these tools and generate the desired output files.
-
M. R. Crusoe, S. Abeln, A. Iosup, P. Amstutz, J. Chilton, N. Tijanić, H. Ménager, S. Soiland-Reyes, B. Gavrilović, C. Goble, The CWL Community (2021): Methods Included: Standardizing Computational Reuse and Portability with the Common Workflow Language. Communication of the ACM. https://doi.org/10.1145/3486897 ↩
Key Points
CWL is a standard for describing workflows based on command-line tools
CWL workflows are written in a subset of YAML
A CWL workflow is more portable than a shell script
CWL supports software containers, supporting reproducibility on different machines
CWL and Shell Tools
Overview
Teaching: 0 min
Exercises: 0 minQuestions
What is the difference between a CWL tool description and a CWL workflow?
How can we create a tool descriptor?
How can we use this in a single step workflow?
Objectives
describe the relationship between a tool and its corresponding CWL document
exercise good practices when naming inputs and outputs
understand how to reference files for input and output
explain that only files explicitly mentioned in a description will be included in the output of a step/workflow
implement bulk capturing of all files produced by a step/workflow for debugging purposes
use STDIN and STDOUT as input and output
capture output written to a specific directory, the working directory, or the same directory where input is located
CWL workflows are written in the YAML syntax. This short tutorial explains the parts of YAML used in CWL. A CWL document contains the workflow and the requirements for running that workflow. All CWL documents should start with two lines of code:
cwlVersion: v1.2
class:
The cwlVersion string defines which standard of the language is required for the tool or workflow. The most recent version is v1.2.
The class field defines what this particular document is. The majority of CWL documents will fall into
one of two classes: CommandLineTool, or Workflow. The CommandLineTool class is used for
describing the interface for a command-line tool, while the Workflow class is used for connecting those
tool descriptions into a workflow. In this lesson the differences between these two classes are explained,
how to pass data to and from command-line tools and specify working environments for these, and finally
how to use a tool description within a workflow.
Our first CWL script
To demonstrate the basic requirements for a tool descriptor a CWL description for the popular “Hello world!” demonstration will be examined.
echo.cwl
cwlVersion: v1.2
class: CommandLineTool

baseCommand: echo

inputs:
  message_text:
    type: string
    inputBinding:
      position: 1

outputs: []
Next, the input file: hello_world.yml.
hello_world.yml
message_text: Hello world!
We will use the reference CWL runner, cwltool to run this CWL document (the .cwl workflow file) along with the .yml input file.
cwltool echo.cwl hello_world.yml
INFO Resolved 'echo.cwl' to 'file:///.../echo.cwl'
INFO [job echo.cwl] /private/tmp/docker_tmprm65mucw$ echo \
    'Hello world!'
Hello world!
INFO [job echo.cwl] completed success
{}
INFO Final process status is success
The output displayed above shows that the program has run succesfully and its output, Hello world!.
Let’s take a look at the echo.cwl script in more detail.
As explained above, the first 2 lines are always the same, the CWL version and the class of the script are defined.
In this example the class is CommandLineTool, in particular the echo command.
The next line, baseCommand, contains the command that will be run (echo).
inputs:
  message_text:
    type: string
    inputBinding:
    position: 1
This block of code contains the inputs section of the tool description. This section provides all the inputs that are needed for running this specific tool.
To run this example we will need to provide a string which will be included on the command line. Each of the inputs has a name, to help us tell them apart; this first input has the name : message_text.
The field inputBinding is one way to specify how the input should appear on the command line.
Here the position field indicates at which position the input will be on the command line; in this case the message_text value will be the first thing added to the command line (after the baseCommand, echo).
outputs: []
Lastly the outputs of the tool description. This example doesn’t have a formal output.
The text is printed directly in the terminal. So an empty YAML list ([]) is used as the output.
Script order
To make the script more readable the
inputfield is put in front of theoutputfield. However CWL syntax requires only that each field is properly defined, it does not require them to be in a particular order.
Changing input text
What do you need to change to print a different text on the command line?
Solution
CWL single step workflow
The RNA-seq data from the introduction episode will be used for the first CWL workflow.
The first step of RNA-sequencing analysis is a quality control of the RNA reads using the fastqc tool.
This tool is already available to use so there is no need to write a new CWL tool description.
This is the workflow file (rna_seq_workflow.cwl).
rna_seq_workflow.cwl
clwVersion: v1.2
class: Workflow

inputs:
  rna_reads_human: File

steps:
  quality_control:
    run: bio-cwl-tools/fastqc/fastqc_2.cwl
    in:
      reads_file: rna_reads_human
    out: [html_file]

outputs:
  qc_html:
    type: File
      outputSource: quality_control/html_file
In a workflow the steps field must always be present. The workflow tasks or steps that you want to run are listed in this field.
At the moment the workflow only contains one step: quality_control. In the next episodes more steps will be added to the workflow.
Let’s take a closer look at the workflow. First the inputs field will be explained.
inputs:
  rna_reads_human: File
Looking at the CWL script of the fastqc tool, it needs a fastq file as its input. In this example the fastq file consists of human RNA reads.
So we call the variable rna_reads_human and it has File as its type.
To make this workflow interpretable for other researchers, self-explanatory and sensible variable names are used.
Input and output names
It is very important to give inputs and outputs a sensible name. Try not to use variable names like
inputAorinputBbecause others might not understand what is meant by it.
The next part of the script is the steps field.
steps:
  quality_control:
    run: bio-cwl-tools/fastqc/fastqc_2.cwl
    in:
      reads_file: rna_reads_human
    out: [html_file]
Every step of a workflow needs an name, the first step of the workflow is called quality_control. Each step needs a run field, an in field and an out field.
The run field contains the location of the CWL file of the tool to be run. The in field connects the inputs field to the fastqc tool.
The fastqc tool has an input parameter called reads_file, so it needs to connect the reads_file to rna_reads_human.
Lastly, the out field is a list of output parameters from the tool to be used. In this example, the fastqc tool produces an output file called html_file.
The last part of the script is the output field.
outputs:
  qc_html:
    type: File
	outputSource: quality_control/html_file
Each output in the outputs field needs its own name. In this example the output is called qc_html.
Inside qc_html the type of output is defined. The output of the quality_control step is a file, so the qc_html type is File.
The outputSource field refers to where the output is located, in this example it came from the step quality_control and it is called html_file.
When you want to run this workflow, you need to provide a file with the inputs the workflow needs. This file is similar to the hello_world.yml file in the previous section.
The input file is called workflow_input.yml
workflow_input.yml
rna_reads_human:
  class: File
  location: rnaseq/raw_fastq/Mov10_oe_1.subset.fq
  format: http://edamontology.org/format_1930
In the input file the values for the inputs that are declared in the inputs section of the workflow are provided.
The workflow takes rna_reads_human as an input parameter, so we use the same variable name in the input file.
When setting inputs, the class of the object needs to be defined, for example class: File or class: Directory. The location field contains the location of the input file.
In this example the last line is needed to provide a format for the fastq file.
Now you can run the workflow using the following command:
cwltool rna_seq_workflow.cwl workflow_input.yml
...
Analysis complete for Mov10_oe_1.subset.fq
INFO [job quality_control] Max memory used: 193MiB
INFO [job quality_control] completed success
INFO [step quality_control] completed success
INFO [workflow ] completed success
{
    "qc_html": {
        "location": "file://.../novice-tutorial-exercises/Mov10_oe_1.subset_fastqc.html",
        "basename": "Mov10_oe_1.subset_fastqc.html",
        "class": "File",
        "checksum": "sha1$46417ab64dd657ec50d86f7d23b2859bee74199f",
        "size": 383589,
        "path": ".../novice-tutorial-exercises/Mov10_oe_1.subset_fastqc.html"
    }
}
INFO Final process status is success
Exercise
Needs some exercises
Key Points
First key point. Brief Answer to questions. (FIXME)
Developing Multi-Step Workflows
Overview
Teaching: 0 min
Exercises: 0 minQuestions
How can we expand to a multi-step workflow?
Iterative workflow development
Workflows as dependency graphs
How to use sketches for workflow design?
Objectives
explain that a workflow is a dependency graph
use cwlviewer online
generate Graphviz diagram using cwltool
exercise with the printout of a simple workflow; draw arrows on code; hand draw a graph on another sheet of paper
recognise that workflow development can be iterative i.e. that it doesn’t have to happen all at once
understand the flow of data between tools
Multi-Step Workflow
In the previous episode a single step workflow was shown. To make a multi-step workflow, you add more entries to the steps field.
In this episode, the workflow is extended with the next two steps of the RNA-sequencing analysis.
The next two steps are alignment of the reads and indexing the alignments.
We will be using the STAR and samtools tools for these tasks.
rna_seq_workflow.cwl
cwlVersion: v1.2
class: Workflow

inputs:
  rna_reads_human: File
  ref_genome: Directory

steps:
  quality_control:
    run: bio-cwl-tools/fastqc/fastqc_2.cwl
    in:
      reads_file: rna_reads_human
    out: [html_file]

  mapping_reads:
    requirements:
      ResourceRequirement:
        ramMin: 9000
    run: bio-cwl-tools/STAR/STAR-Align.cwl
    in:
      RunThreadN: {default: 4}
      GenomeDir: ref_genome
      ForwardReads: rna_reads_human
      OutSAMtype: {default: BAM}
      SortedByCoordinate: {default: true}
      OutSAMunmapped: {default: Within}
    out: [alignment]

  index_alignment:
    run: bio-cwl-tools/samtools/samtools_index.cwl
    in:
      bam_sorted: mapping_reads/alignment
    out: [bam_sorted_indexed]

outputs:
  qc_html:
    type: File
    outputSource: quality_control/html_file
  bam_sorted_indexed:
    type: File
    outputSource: index_alignment/bam_sorted_indexed
The workflow file shows the first 3 steps of the RNA-seq analysis: quality_control, mapping_reads and index_alignment.
The index_alignment step uses the alignment output of the mapping_reads step.
You do this by referencing the output of the mapping_reads step in the in field of the index_alignment step.
This is similar to referencing the outputs of the different steps in the outputs section.
The mapping_reads step needs some extra information beyond the inputs from the other steps, which is done by providing default values. If you want, you can read the bio-cwl-tools/STAR/STAR-Align.cwl file to see how these extra inputs are transformed into command line options to the STAR program.
This information is provided in the in field.
To run the tool better, it needs more RAM than the default. So there is a requirements entry inside the mapping_reads step definition with a ResourceRequirement to allocate a minimum of 9000 MiB of RAM.
The newly added mapping_reads step also need an input not provided by any of our other steps, therefore an additional workflow-level input is added: a directory that contains the reference genome necessary for the mapping.
This ref_genome is added in the inputs field of the workflow and in the YAML input file, workflow_input.yml.
workflow_input.yml
rna_reads_human:
  class: File
  location: rnaseq/raw_fastq/Mov10_oe_1.subset.fq
  format: http://edamontology.org/format_1930
ref_genome:
  class: Directory
  location: hg19-chr1-STAR-index
Exercise
Draw the connecting arrows in the following graph of our workflow. Also, provide the outputs/inputs of the different steps. You can use for example Paint or print out the graph.
Solution
Iterative working
Working on a workflow is often not something that happens all at once. Sometimes you already have a shell script ready that can be converted to a CWL workflow. Other times it is similar to this tutorial, you start with a single-step workflow and extend it to a multi-step workflow. This is all iterative working, a continuous work in progress.
Visualising a workflow
A CWL workflow is a directed acyclic graph (DAG). This means that:
- The workflow has a certain direction, from workflow inputs to step inputs, from step outputs to other step inputs, and from step outputs to workflow outputs and
- The workflow definition has no cycles. A CWL workflow is a dependency graph. Each input for a step in the workflow depends on either a workflow-level input or a particular output from another step.
To visualise a workflow, a graph can be used. This can be done before a CWL script is written to visualise how the different steps connect to eachother.
It is also possible to make a graph after the CWL script has been written. This graph can be generated using online tools or the build-in function in cwltool.
When a graph is generated, it can be used to visualise the steps taken and could make it easier to explain a workflow to other researchers.
From CWL script to graph
In this example the workflow is already made, so the graph can be generated using cwlviewer online or using cwltool.
First, let’s have a look at cwlviewer. To use this tool, the workflow has to be put in a GitHub, GitLab or Git repository.
To view the graph of the workflow enter the URL and click Parse Workflow. The cwlviewer displays the workflow as a graph, starting with the input.
Then the different steps are shown, each with their input(s) and output(s). The steps are linked to eachother using arrows accompanied by the input of the next step.
The graph ends with the workflow outputs.
The graph of the RNA-seq workflow looks a follows:
It is also possible to generate the graph in the command line. cwltool has a function that makes a graph.
The --print-dot option will print a file suitable for Graphviz dot program. This is the command to generate a Scalable Vector Graphic (SVG) file:
cwltool --print-dot rna_seq_workflow.cwl | dot -Tsvg > workflow_graph.svg
The resulting SVG file displays the same graph as the one in the cwlviewer. The SVG file can be opened in any web browser and in Inkscape, for example.
Visualisation in VSCode
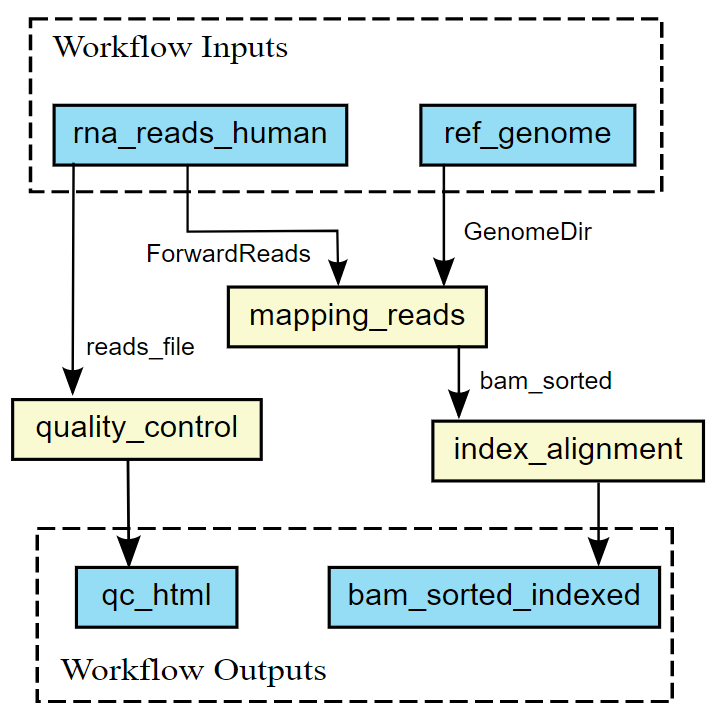
Benten is an extension in Visual Studio Code (VSCode) that among other things visualises a workflow in a graph. When Benten is installed in VSCode, the tool can be used to visualise the workflow. In the top-right corner of the VSCode window the CWL viewer can be opened, see the screenshot below.
.png)
In VSCode/Benten the inputs are shown in green, the steps in blue and the outputs in yellow. This graph looks a little bit different from the graph made with cwlviewer or cwltool.
The graph by VSCode/Benten doesn’t show the output-input names between the different steps.
.png)
Key Points
First key point. Brief Answer to questions. (FIXME)
Resources for Reusing Tools and Scripts
Overview
Teaching: 0 min
Exercises: 0 minQuestions
How to find other solutions/CWL recipes for awkward problems?
Objectives
know good resources for finding solutions to common problems
Pre-written tool descriptions
When you start a CWL workflow, it is recommended to check if there is already a CWL document available for the tools you want to use. Bio-cwl-tools is a library of CWL documents for biology/life-sciences related tools.
The CWL documents of the previous steps were already provided for you, however, you can also find them in this library. In this episode you will use the bio-cwl-tools library to add the last step to the workflow.
Adding new step in workflow
The last step of our workflow is counting the RNA-seq reads for which we will use the featureCounts tool.
Exercise
Find the
featureCountstool in the bio-cwl-tools library. Have a look at the CWL document. Which inputs does this tool need? And what are the outputs of this tool?Solution
We need a local copy of featureCounts in order to use it in our workflow.
We already imported this as a git submodule during setup,
so the tool should be located at bio-cwl-tools/subreads/featureCounts.cwl.
Exercise
Add the
featureCountstool to the workflow. Similar to theSTARtool, this tool also needs more RAM than the default. To run the tool a minimum of 500 MiB of RAM is needed. Use arequirementsentry withResourceRequirementto allocate aramMinof 500. Use the inputs and output of the previous exercise to connect this step to previous steps.Solution
The workflow is complete and we only need to complete the YAML input file.
The last entry in the input file is the annotations file.
workflow_input.yml
rna_reads_human:
  class: File
  location: rnaseq/raw_fastq/Mov10_oe_1.subset.fq
  format: http://edamontology.org/format_1930
ref_genome:
  class: Directory
  location: rnaseq/hg19-chr1-STAR-index
annotations:
  class: File
  location: rnaseq/reference_data/chr1-hg19_genes.gtf
You have finished the workflow and the input file and now you can run the whole workflow.
cwltool rna_seq_workflow.cwl workflow_input.yml
Key Points
First key point. Brief Answer to questions. (FIXME)
Debugging Workflows
Overview
Teaching: 0 min
Exercises: 0 minQuestions
introduce within above lessons?
Objectives
interpret commonly encountered error messages
solve these common issues
Learning objectives
By the end of this episode, learners should be able to recognize and fix simple bugs in their workflow code.
When working on a CWL workflow, you will probably encounter errors. There are many different errors possible. It is always very important to check the error message in the terminal, because it will give you information on the error. This error message will give you the type of error as well as the line of code that contains the error. Some of these errors will be explained in this episode.
As a first step to check if your CWL script contains any errors, you can run the workflow with the --validate flag.
cwltool --validate CWL_SCRIPT.cwl
It is possible that the script is validated, however, it still gets an error.
If you encounter an error, the best practice is to run the workflow with the --debug flag.
This will provide you with extensive information on the error you encounter.
cwltool --debug CWL_SCRIPT.cwl
YAML errors
First of all, errors in the YAML syntax. When writing a piece of code, it is very easy to make a mistake.
Some very common YAML errors are:
-
Using tabs instead of spaces. In YAML files indentations are made using spaces, not tabs. Errors caused by tabs will show
'NoneType' object has no attribute 'name'.cwlVersion: v1.2 class: Workflow inputs: rna_reads_human: File ref_genome: Directory annotations: File steps: quality_control: run: bio-cwl-tools/fastqc/fastqc_2.cwl in: reads_file: rna_reads_human out: [html_file] mapping_reads: requirements: ResourceRequirement: ramMin: 9000 run: bio-cwl-tools/STAR/STAR-Align.cwl in: RunThreadN: {default: 4} GenomeDir: ref_genome ForwardReads: rna_reads_human OutSAMtype: {default: BAM} SortedByCoordinate: {default: true} OutSAMunmapped: {default: Within} out: [alignment] index_alignment: run: bio-cwl-tools/samtools/samtools_index.cwl in: bam_sorted: mapping_reads/alignment out: [bam_sorted_indexed] count_reads: requirements: ResourceRequirement: ramMin: 500 run: bio-cwl-tools/subread/featureCounts.cwl in: mapped_reads: index_alignment/bam_sorted_indexed annotations: annotations out: [featurecounts] outputs: qc_html: type: File outputSource: quality_control/html_file bam_sorted_indexed: type: File outputSource: index_alignment/bam_sorted_indexed featurecounts: type: File outputSource: count_reads/featurecounts$ cwltool rna_seq_workflow.cwl workflow_input.ymlERROR I'm sorry, I couldn't load this CWL file, try again with --debug for more information. The error was: 'NoneType' object has no attribute 'name' -
Typos in field names. It is very easy to forget for example the capital letters in field names. Errors with typos in field names will show
invalid field.cwlVersion: v1.2 class: Workflow inputs: rna_reads_human: File ref_genome: Directory annotations: File steps: quality_control: run: bio-cwl-tools/fastqc/fastqc_2.cwl in: reads_file: rna_reads_human out: [html_file] mapping_reads: requirements: ResourceRequirement: ramMin: 9000 run: bio-cwl-tools/STAR/STAR-Align.cwl in: RunThreadN: {default: 4} GenomeDir: ref_genome ForwardReads: rna_reads_human OutSAMtype: {default: BAM} SortedByCoordinate: {default: true} OutSAMunmapped: {default: Within} out: [alignment] index_alignment: run: bio-cwl-tools/samtools/samtools_index.cwl in: bam_sorted: mapping_reads/alignment out: [bam_sorted_indexed] count_reads: requirements: ResourceRequirement: ramMin: 500 run: bio-cwl-tools/subread/featureCounts.cwl in: mapped_reads: index_alignment/bam_sorted_indexed annotations: annotations out: [featurecounts] outputs: qc_html: type: File outputsource: quality_control/html_file bam_sorted_indexed: type: File outputSource: index_alignment/bam_sorted_indexed featurecounts: type: File outputSource: count_reads/featurecount$ cwltool rna_seq_workflow.cwl workflow_input.ymlERROR Tool definition failed validation: rna_seq_workflow.cwl:1:1: Object `rna_seq_workflow.cwl` is not valid because tried `Workflow` but rna_seq_workflow.cwl:46:1: the `outputs` field is not valid because rna_seq_workflow.cwl:47:3: item is invalid because rna_seq_workflow.cwl:49:5: invalid field `outputsource`, expected one of: 'label', 'secondaryFiles', 'streamable', 'doc', 'id', 'format', 'outputSource', 'linkMerge', 'pickValue', 'type' -
Typos in variable names. Similar to typos in field names, it is easy to make a mistake in referencing to a variable. These errors will show
Field references unknown identifier.cwlVersion: v1.2 class: Workflow inputs: rna_reads_human: File ref_genome: Directory annotations: File steps: quality_control: run: bio-cwl-tools/fastqc/fastqc_2.cwl in: reads_file: rna_reads_human out: [html_file] mapping_reads: requirements: ResourceRequirement: ramMin: 9000 run: bio-cwl-tools/STAR/STAR-Align.cwl in: RunThreadN: {default: 4} GenomeDir: ref_genome ForwardReads: rna_reads_human OutSAMtype: {default: BAM} SortedByCoordinate: {default: true} OutSAMunmapped: {default: Within} out: [alignment] index_alignment: run: bio-cwl-tools/samtools/samtools_index.cwl in: bam_sorted: mapping_reads/alignments out: [bam_sorted_indexed] count_reads: requirements: ResourceRequirement: ramMin: 500 run: bio-cwl-tools/subread/featureCounts.cwl in: mapped_reads: index_alignment/bam_sorted_indexed annotations: annotations out: [featurecounts] outputs: qc_html: type: File outputSource: quality_control/html_file bam_sorted_indexed: type: File outputSource: index_alignment/bam_sorted_indexed featurecounts: type: File outputSource: count_reads/featurecounts$ cwltool rna_seq_workflow.cwl workflow_input.ymlERROR Tool definition failed validation: rna_seq_workflow.cwl:9:1: checking field `steps` rna_seq_workflow.cwl:30:3: checking object `rna_seq_workflow.cwl#index_alignment` rna_seq_workflow.cwl:32:5: checking field `in` rna_seq_workflow.cwl:33:7: checking object `rna_seq_workflow.cwl#index_alignment/bam_sorted` Field `source` references unknown identifier `mapping_reads/alignments`, tried file:///.../rna_seq_workflow.cwl#mapping_reads/alignments
Wiring error
Wiring errors often occur when you forget to add an output from a workflow’s step to the outputs section.
This doesn’t cause an error message, but there won’t be any output in your directory.
To get the desired output you have to run the workflow again.
Best practice is to check your outputs section before running your script to make sure all the outputs you want are there.
Type mismatch
Type errors take place when there is a mismatch in type between variables.
When you declare a variable in the inputs section, the type of this variable has to match the type in the YAML inputs file
and the type used in one of the workflows steps.
The error message that is shown when this error occurs will tell you on which line the mismatch happens.
cwlVersion: v1.2
class: Workflow

inputs:
  rna_reads_human: int
  ref_genome: Directory
  annotations: File

steps:
  quality_control:
    run: bio-cwl-tools/fastqc/fastqc_2.cwl
    in:
      reads_file: rna_reads_human
    out: [html_file]

  mapping_reads:
    requirements:
      ResourceRequirement:
        ramMin: 9000
    run: bio-cwl-tools/STAR/STAR-Align.cwl
    in:
      RunThreadN: {default: 4}
      GenomeDir: ref_genome
      ForwardReads: rna_reads_human
      OutSAMtype: {default: BAM}
      SortedByCoordinate: {default: true}
      OutSAMunmapped: {default: Within}
    out: [alignment]

  index_alignment:
    run: bio-cwl-tools/samtools/samtools_index.cwl
    in:
      bam_sorted: mapping_reads/alignment
    out: [bam_sorted_indexed]

  count_reads:
    requirements:
      ResourceRequirement:
        ramMin: 500
    run: bio-cwl-tools/subread/featureCounts.cwl
    in:
      mapped_reads: index_alignment/bam_sorted_indexed
      annotations: annotations
    out: [featurecounts]

outputs:
  qc_html:
    type: File
    outputSource: quality_control/html_file
  bam_sorted_indexed:
    type: File
    outputSource: index_alignment/bam_sorted_indexed
  featurecounts:
    type: File
    outputSource: count_reads/featurecounts
$ cwltool rna_seq_workflow.cwl workflow_input.yml
ERROR Tool definition failed validation:

rna_seq_workflow.cwl:5:3:   Source 'rna_reads_human' of type "int" is incompatible
rna_seq_workflow.cwl:24:7:   with sink 'ForwardReads' of type ["File", {"type": "array", "items":
                             "File"}]
rna_seq_workflow.cwl:5:3:   Source 'rna_reads_human' of type "int" is incompatible
rna_seq_workflow.cwl:13:7:   with sink 'reads_file' of type ["File"]
Format error
Some files need a specific format that needs to be specified in the YAML inputs file, for example the fastq file in the RNA-seq analysis. When you don’t specify a format, an error will occur. You can for example use the EDAM ontology.
rna_reads_human:
  class: File
  location: rnaseq/raw_fastq/Mov10_oe_1.subset.fq
ref_genome:
  class: Directory
  location: rnaseq/hg19-chr1-STAR-index
annotations:
  class: File
  location: rnaseq/reference_data/chr1-hg19_genes.gtf
$ cwltool rna_seq_workflow.cwl workflow_input.yml
ERROR Exception on step 'mapping_reads'
ERROR [step mapping_reads] Cannot make job: Expected value of 'ForwardReads' to have format http://edamontology.org/format_1930 but
  File has no 'format' defined: {
    "class": "File",
    "location": "file:///home/mbexegc2/Documents/projects/bioexcel/follow-cwl-novice-tutorial/novice-tutorial-exercises/rnaseq/raw_fastq/Mov10_oe_1.subset.fq",
    "size": 75706556,
    "basename": "Mov10_oe_1.subset.fq",
    "nameroot": "Mov10_oe_1.subset",
    "nameext": ".fq"
}
Key Points
First key point. Brief Answer to questions. (FIXME)
More information
Overview
Teaching: min
Exercises: minQuestions
Objectives
If you want to know more about CWL script and workflows, you can look at one of these websites:
- CWL User Guide
- YAML Guide
- Extra CWL Command Line Tool information
- Miscellaneous CWL information
- Recommended Practices in CWL
Key Points